Why do images look blurry on my website?. By Graeme Leslie, Designtastic

If you’ve ever built or managed websites, you’ve probably encountered this issue at some point.
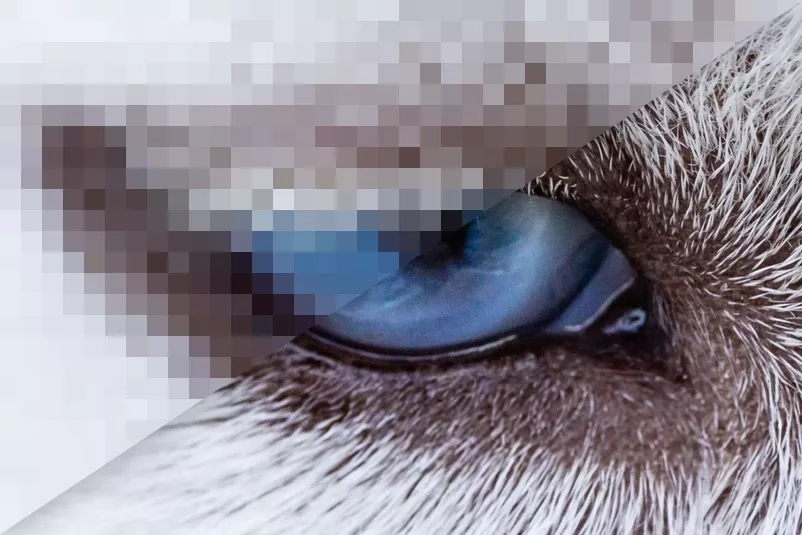
You upload an image to your site, one with a seemingly high resolution- but once it’s been published, the quality has dropped. And, with it, the quality of the design of your website as a whole.
This can be infuriating, especially if there’s no obvious explanation. So… what is the explanation? Today we’ll be discussing what causes images to look blurry on websites, and how you can fix this problem.
The main reason images look blurry on your website
If the images on your website look blurry, it’s probably because they’re not big enough. When an image has been saved at too small a size, your browser will stretch them out to make them fit. This is the main cause of blurry, or pixelated, images.
Unfortunately, this doesn’t mean the solution is publishing large images. If an image is too large, you’ll encounter an entirely new problem: slow page load speeds. And if your website isn’t loading fast enough, you could end up losing customers.
It usually works like this:
The smaller your image dimensions, the faster the page will load, but the worse the image will look
The larger the image dimensions, the slower the page will load, but the better the image will look
How big should the images on my website be?
The ideal size for your images will vary, so it’s hard to recommend specific measurements. What matters is making your image dimensions as large as they need to be, and no larger. If your image looks good but is large to the point of slowing down your loading speeds, try and work out the minimum dimensions it will need to retain its quality. If these dimensions don’t affect the loading speed, you’re all set. If they do still affect speed, you’ll need to try and find a balance.
When creating your own images, it’s generally recommended that you should export at 200% their original size… but, again, this may affect loading speed.
Luckily there are plenty of ways to resize your images. On Windows, for example, you can adjust image dimensions using Microsoft Paint. To see an image’s current dimensions, right click on it and select ‘Properties’. This will allow you to see the width in pixels, and the height in pixels.
Tips for making your website’s images less blurry
Getting the most of the images on your website can be frustrating and, sometimes, resizing just won’t cut it. If you’re struggling to strike the balance between image size and load speeds, keep in mind the following tips:
Most computer screens display 72 dots per inch (dpi), dots being what makes up any given image. If you want your images to look good, make sure they’re 72 dpi. You can check an image’s dpi via ‘Properties’. For most images, you won’t need to change the dpi, but if you do need to make an adjustment, there are plenty of free tools available online. Or Photoshop, if you have it.
For certain images, typically simpler ones like logos, saving them as an SVG (Scalable Vector Graphic) will avoid all sizing issues. SVG images are made up of code which defines exactly how the image is going to look, meaning regardless of screen definition, it’ll look the same way.
The ideal size for images will differ depending on if it’s being published as a standard image, or as a header display. Header displays should typically be 1200 pixels wide.
Need a hand with ensuring your website captivates your audience? We’re a creative company with an extensive range of services for marketing your business, including responsive website design. Let's transform your website into a digital masterpiece together – get started now by messaging Graeme!